File Transfering
Understanding The Difference Between Upload / Download
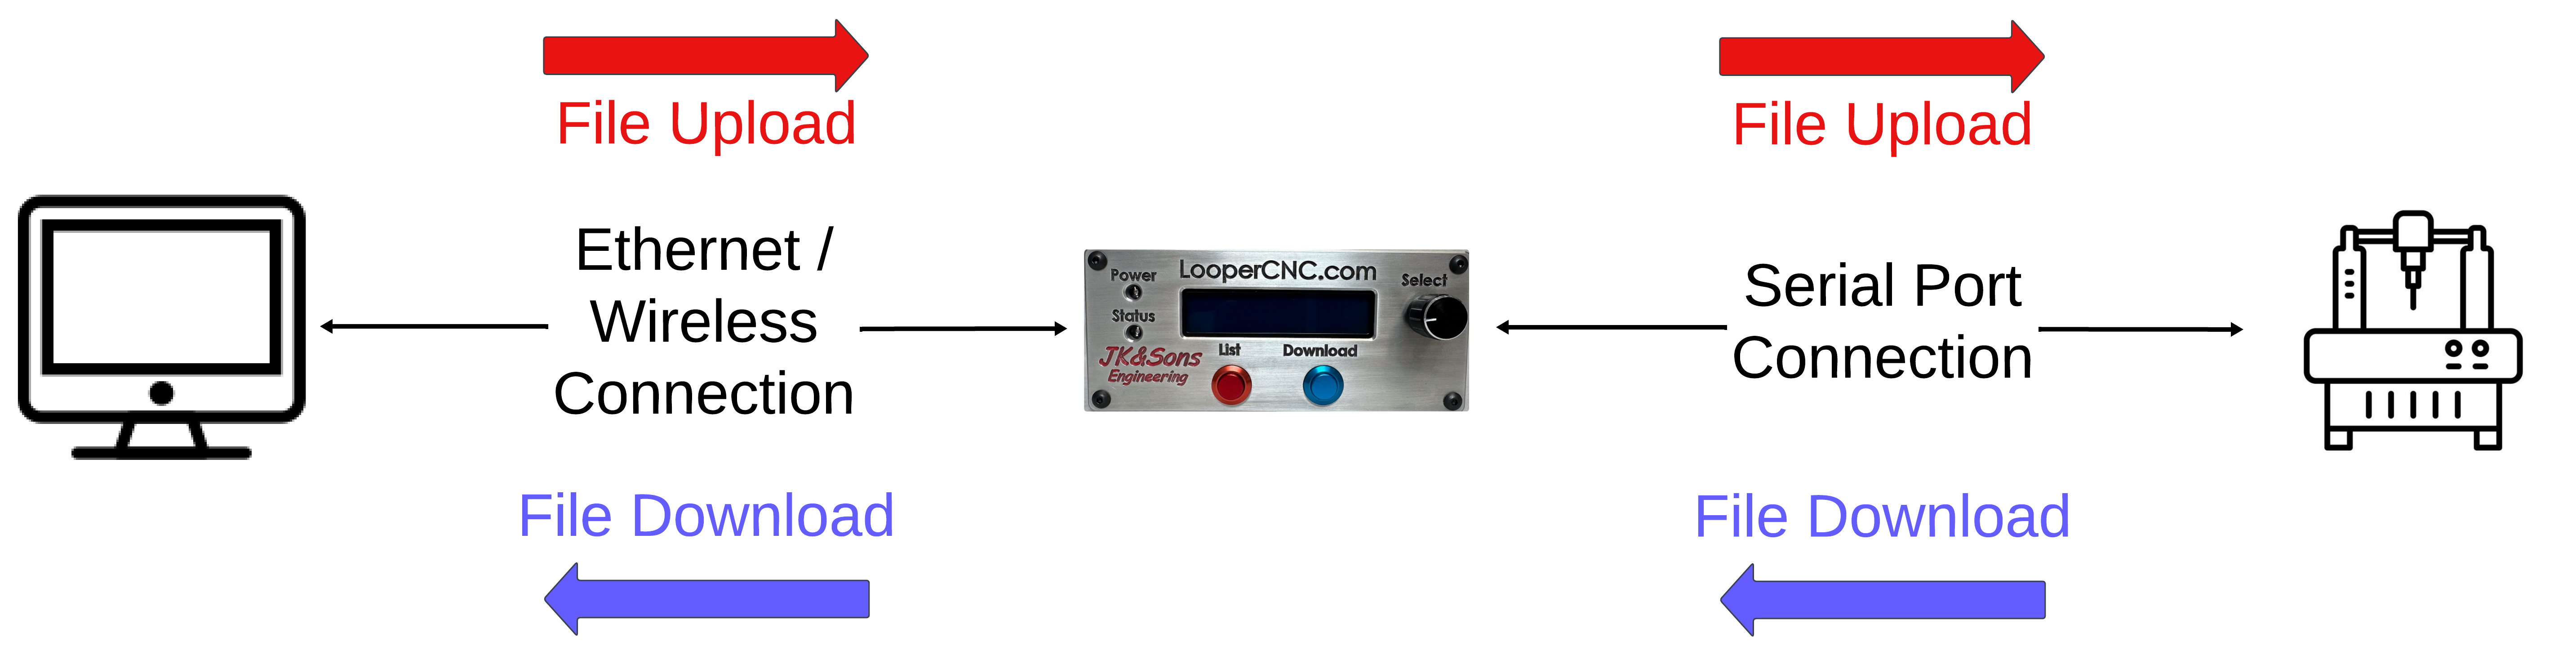
The image above shows the difference between a File Upload and a File Download. When we refer to a File Upload we will either be referring to a case in which a file is “Uploaded” from a computer to the Looper Box OR when a file is on the Looper Box and ready to be “Uploaded” to the CNC Machine.
On the other hand, when we are talking about a situation where the CNC machine is sending a file to the Looper Box (ex. Log Files / Old G Code Files), this is referred to as a file “Download.” Similarly, when a file is on the Looper Box and needed to be sent to the computer, this would also be referred to as a “Download.”
Computer to Looper Upload
Using Looper Dashboad to Upload
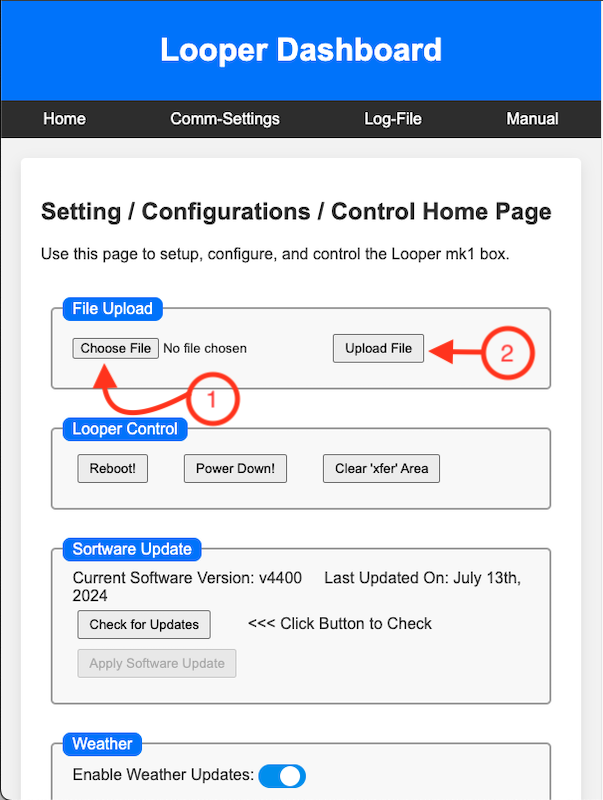
Choose File: Click the “Choose File” button to select the file you want to upload.
Click the “Upload File” Button: Select the desired file and click the Upload button on the Looper webpage. The file name will appear on the Looper box’s display, indicating that the file has been successfully transferred to Looper’s internal storage.
Note: If completed correctly, the Looper Box “Status Light” should begin to blink green. The green flash is an indicator that the Looper Box has a file that is ready for the machine to download.
Store the File: Once uploaded, the program will be stored in Looper’s internal storage, ready for transfer to your CNC machine. The file name that you uploaded on the Looper Webpage Dashboard should the same name that is being displayed on the Looper Box display.
Prepare Your CNC Machine: On your CNC machine, open the receive window or the equivalent interface for downloading files from a connected device.
Press the Download Button: On the Looper box, press the Download Button to initiate the transfer process.
Complete the Transfer: Follow your machine’s standard download process to move the program from Looper’s internal storage to your machine’s local memory.
Using Mac Finder to Upload
Using Windows Explorer to Upload
Looper to CNC Upload
HAAS CNC
In order to upload a file to the CNC machine, the following steps must be taken:
The CNC Machine must be on the “LIST PROG” screen in order to receive a file from the Looper Box.
After navigating to this screen, put the CNC cursor on the “ALL” button at the bottom of the list of programs.
Select the “RECV” key on the CNC control panel.
Finally, select the “Download” button on the Looper Box.
The program will then be uploaded from the Looper Box to the CNC machine.
FANUC CNC
In order to upload a file to the CNC machine, the following steps must be taken:
Ensure the CNC machine is in the “EDIT” mode.
Navigate to the “PROGRAM” screen.
Select “INPUT” on the CNC control panel.
On the Looper Box, press the “Download” button.
The program will then be uploaded from the Looper Box to the CNC machine.
Siemens CNC
In order to upload a file to the CNC machine, the following steps must be taken:
Ensure the CNC machine is in the “OPERATE” mode.
Navigate to the “NC Program” screen.
Select “File” > “Import” from the menu.
On the CNC control panel, press the “Receive” button.
On the Looper Box, press the “Download” button.
The program will then be uploaded from the Looper Box to the CNC machine.
Mazak CNC
In order to upload a file to the CNC machine, the following steps must be taken:
Ensure the CNC machine is in the “EDIT” mode.
Navigate to the “PROGRAM” screen.
Select “Data I/O” and choose “Input”.
On the CNC control panel, press the “Read” button.
On the Looper Box, press the “Download” button.
The program will then be uploaded from the Looper Box to the CNC machine.
Okuma CNC
In order to upload a file to the CNC machine, the following steps must be taken:
Ensure the CNC machine is in the “EDIT” mode.
Navigate to the “PROGRAM” screen.
Select “DATA INPUT/OUTPUT” and choose “Input”.
On the CNC control panel, press the “Read” button.
On the Looper Box, press the “Download” button.
The program will then be uploaded from the Looper Box to the CNC machine.
Mitsubishi CNC
In order to upload a file to the CNC machine, the following steps must be taken:
Ensure the CNC machine is in the “EDIT” mode.
Navigate to the “PROGRAM” screen.
Select “DATA I/O” and choose “Input”.
On the CNC control panel, press the “Read” button.
On the Looper Box, press the “Download” button.
The program will then be uploaded from the Looper Box to the CNC machine.
Heidenhain CNC
In order to upload a file to the CNC machine, the following steps must be taken:
Ensure the CNC machine is in the “Program” mode.
Navigate to the “PROGRAM” screen.
Select “File” > “Import” from the menu.
On the CNC control panel, press the “Receive” button.
On the Looper Box, press the “Download” button.
The program will then be uploaded from the Looper Box to the CNC machine.
Brother CNC
In order to upload a file to the CNC machine, the following steps must be taken:
Ensure the CNC machine is in the “Edit” mode.
Navigate to the “PROGRAM” screen.
Select “Data I/O” and choose “Input”.
On the CNC control panel, press the “Receive” button.
On the Looper Box, press the “Download” button.
The program will then be uploaded from the Looper Box to the CNC machine.
DMG Mori CNC
In order to upload a file to the CNC machine, the following steps must be taken:
Ensure the CNC machine is in the “Edit” mode.
Navigate to the “PROGRAM” screen.
Select “Data I/O” and choose “Input”.
On the CNC control panel, press the “Receive” button.
On the Looper Box, press the “Download” button.
The program will then be uploaded from the Looper Box to the CNC machine.
Hurco CNC
In order to upload a file to the CNC machine, the following steps must be taken:
Ensure the CNC machine is in the “Edit” mode.
Navigate to the “PROGRAM” screen.
Select “Data I/O” and choose “Input”.
On the CNC control panel, press the “Receive” button.
On the Looper Box, press the “Download” button.
The program will then be uploaded from the Looper Box to the CNC machine.